
As you may know, making character/human-like build as a parkour map is not very easy, so I'm gonna give you a little tutorial on how I build my character maps and help you improve so your video game character map do not looks like a //sphere festival, your human build do not looks like an octopus, or your cartoon character build you just made do not always do a T-pose/looks like a stick/is in recovery position.
This do not mean all the tips here will be useful for everyone and this is not a miracle guide (it's not even a guide), you have your own way of building and those tips are just my way of building that I wanna share.
So now let's go with a few tips.
I may add more tips a next time, but I will stop here, just remember it's not a guide but just some tricks so you can improve making human-like maps.
Hope this thread was useful
This do not mean all the tips here will be useful for everyone and this is not a miracle guide (it's not even a guide), you have your own way of building and those tips are just my way of building that I wanna share.
So now let's go with a few tips.
When you are making an human-like build, the big advantage is you can use your own body if you need an original position. Wanna make a walking character ? Just walk quickly in your room and see which part of your body is at which place. You don't know how to build the left arm of your character ? Do a little pose with your left arm so you can see where your elbow is compared to your shoulder or on which side the thumb is for the hand.
I guess with more complicated position, using your own body would be quite... sporty, but I think it's a good way to start making some cool and original position.
I guess with more complicated position, using your own body would be quite... sporty, but I think it's a good way to start making some cool and original position.
When you build a character that you do not invent, using a picture from the original content is a must, I don't think you wanna build something with your own memory right ?
I personally recommend using a lot of pictures for your character, do not stick with only one or two pictures, using pictures from a lot of point of view or position is way better. In my case I generally use 4 pictures for just one character, so I can have a maximum of point of view (front view, side view, from behind, and if needed, from above/under) and poses, I even sometimes use fan-arts because sometimes, some view are impossible to get. But stick with more original content images as much as you can and use the fan mades as a last option.
You are also free to use a 3D model from internet so you can have every views, but you need to be really careful with the size and colors, generally the size/colors used are different to the original character and can create some complication.
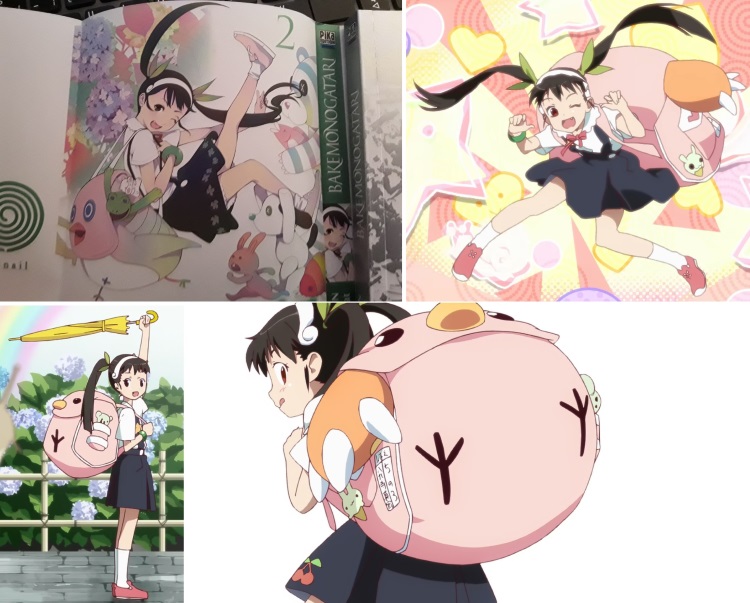
Those pictures are the 4 pictures I used to build Hachikuji, one is a front view using the pose I made on the map, a second one use another pose from a different content, the third one use a side view with a background, and the 4th use a back view
When you have an idea of what you wanna build, with the pose, size and colors you will use, there is still a few things to prepare before really starting.
In my case I prepare 1 or 2 things, most of the time I prepare the block palette I will use through the build, which I place at the edge of the plot so I can use them later. And in other cases, I prepare the size of the map, so I can see where and how big the head is, how long are the leg, or where the shoulders start, it's not something I do much now, but it's kinda useful if you are really not sure about the size.
In my case I prepare 1 or 2 things, most of the time I prepare the block palette I will use through the build, which I place at the edge of the plot so I can use them later. And in other cases, I prepare the size of the map, so I can see where and how big the head is, how long are the leg, or where the shoulders start, it's not something I do much now, but it's kinda useful if you are really not sure about the size.
Building a new map is cool, but is there a better place to start ? That depend.
Depending where you start (and how much details you wanna make), your build will be more or less big. For example if you start with the body, in general the build at the end should be smaller than you thought, because it's generally a place with less details. In another hand, starting with the face, your build should be bigger than expected, because there is a lot of details on the face.
I also do not suggest starting from extreme spots, like the hands or the feet, it's just kinda harder starting from those spots.
So everything depend, if you wanna build something rather small, I suggest you starting from the body (or a big spot with a few details), but if you wanna add more details, start from the head ! (or a big spot with a lot of details)
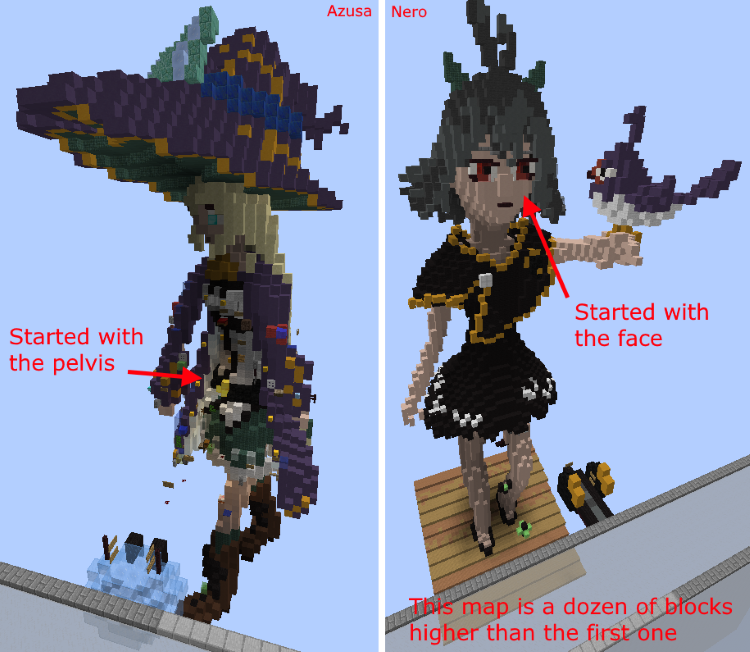
Here is an example of 2 maps (Azusa and Nero) which I started from 2 different spots
When you draw something, you generally start with a plan, it's the same here, try adding some columns/line when you are building a part of the body, like making the spinnal column for the body. Same thing with the legs and arms, you will make those lines thicker after. Feel free adding (and changing) a lot of those skeletons line, like one straight line for the shoulders, or one circle-ish line for the perimeter of the head, feel free using //line for straight lines.
After making those lines from the previous tip, try completing the body by making those lines thicker, makes sure the pelvis and the shoulders are thicker than the hips, same thing with the butt, makes sure it's a bit thicker than the rest, and add a little neck in the middle top of the body (Everything depend if your character is muscular or have breasts for example).
Unless you wanna build an octopus (then why are you here ?), I'm pretty sure you don't want legs/arms that looks like spaghetti. So here's a tip : Your arms/legs are separated in 2 parts, with the elbows/knees between them (without counting the hands/feet). So with the 5th tip, build 2 straight lines connected to the other (with one starting from the shoulders of the body you made before if you made one), then makes those lines thicker. When you finished, makes sure the connection between those 2 (thick) lines is visible, it's supposed to be the elbow/knee. Then build the hand/foot at the extreme of the 2 connected lines, if you are unsure about the size/place of the toes/fingers (like the thumbs), just follow the first tip !
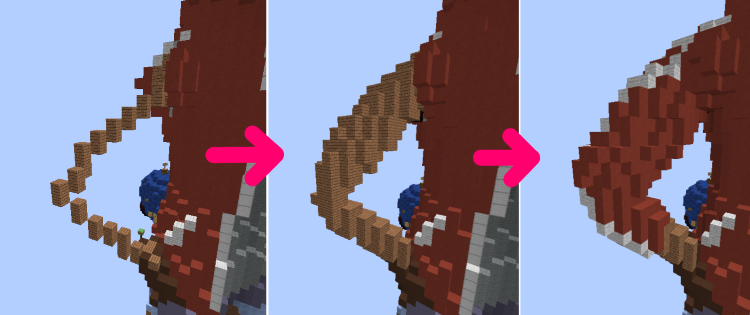
I kinda cheated, but this is how I build arms (Example with ReadyTo), first you do 2 lines, after you make them thicker, and then you add a cloth
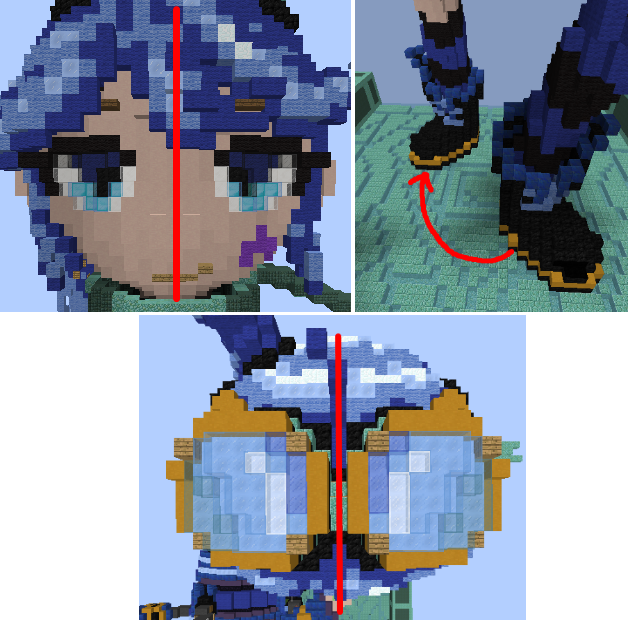
W/E is a create tool you should use, but not abuse. In my opinion, using brushes (excepted during the 13th tip) should be forbidden when making a map, never use //brush sphere or //sphere, please, unless you are really good with brushes and you know what you are doing (but then why are you reading this ?). But w/e is still cool ! I personally use //copy, //flip, //rotate and //paste a lot. Generally when you cut a character vertically in 2, you will see the body is kind of a mirror, so if you wanna save time, using //flip is very useful ! After you finished with //flip, just change a few things so it match the few difference between the left and right side of the character.
How to use //copy : Select 2 blocks with //pos1 and //pos2 (or your wand) for your area, then //copy, the spot where you copy is important, if you copy something 2 blocks on your right, you will paste it also 2 blocks on your right.
How to use //flip : After copying an area, looks at the side you wanna mirror your copy then do //flip (If you look up or down, your copy will be upside down) (You can't flip something diagonally)
How to use //rotate : After copying an area, use //rotate [X ;Y ; Z] to rotate the copy (use degrees on your rotate command, you can also use negative numbers) (Example : //rotate 90 -90 180)
How to use //paste : After copying an area and doing all the stuff before (if you wanted), do //paste on the spot you want.
Example of //flip and //rotate usage with Abigail, we can easily see the mirror but with a few difference
Those 2 commands are also useful when building a character (or any type of maps), one thing you should be avoid the most is replacing one area of one block with multiple blocks, it's in my opinion, really ugly when the blocks are too different (it's fine for really similar blocks, like any type of stone bricks together (cracked, mossy and normal)), so please avoid that, those 2 commands stay still useful if you wanna earn times instead of (re)placing blocks one by one.
The head is probably the hardest part if you wanna add details.
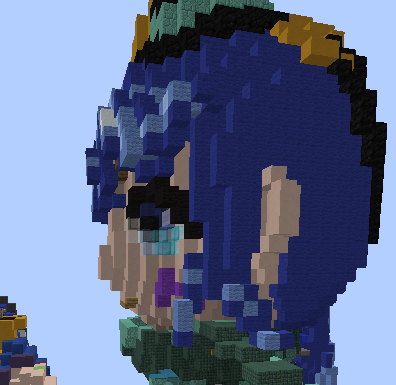
If you started with the head, I suggest directly making the face, makes sure the eyes are kinda spaced without being too far from each other, also if you can, try making it so we can nicely see those eyes from the side view. Adding a nose could be good too, even a small one but makes sure it's not too visible unless the character have a big and visible nose. For the mouth, try making something with slabs or custom heads if you want a simple closed mouth, then add stuff behind the face to create the head, makes sure it looks like a ball and it's linked with the neck from behind the head so you can have a sort of chin and jawbone.
If you started with the body, for the head try making a ball (as wide as the hips for more realistic characters) (without using //sphere), but makes sure the face is a bit more flat that the rest. Makes sure the neck is linked to the head from behind so you can have a sort of chin and jawbone.
While it's easier to do a simple flat face, if you can makes the eyes visible from a side view like I did with Abigail here, it's even better
After making the head, you need to add the hairs and ears, the ears are simple as you just need to makes sure they are centered on the 2 sides of the head, they are generally placed at the same heigh as the eyes or nose, and makes sure one ear is not placed too far away compared to the other one (Feel free looking from above the build).
For the hairs (if your character is not bald or is missing hairs on some spots), you just need to place a different block compared to what you already used almost everywhere on the head, excepted around the neck and the face, feel free checking with your own hairs and the pictures you are using to see where the hairs stop (Sorry if you are bald). When you did that, try adding some strands if you character have some, makes sure it do not looks too random.
For the hairs (if your character is not bald or is missing hairs on some spots), you just need to place a different block compared to what you already used almost everywhere on the head, excepted around the neck and the face, feel free checking with your own hairs and the pictures you are using to see where the hairs stop (Sorry if you are bald). When you did that, try adding some strands if you character have some, makes sure it do not looks too random.
There is multiple ways and moment to build the clothes, you can replace the blocks you used to make the body with the color of the clothes you will build, or add one layer of blocks on the body you made. While it's faster in the first case, you will be forced adding layers with longer clothes, like a dress.
Like with the body, I suggest making a plan of the clothes by doing the outline for each cloth (for example with a dress, do a circle around the legs at the bottom of the dress you will build, it will be the limit of your dress, you will just need to link this circle with the main body)
Like with the body, I suggest making a plan of the clothes by doing the outline for each cloth (for example with a dress, do a circle around the legs at the bottom of the dress you will build, it will be the limit of your dress, you will just need to link this circle with the main body)
Coloring a build is not as easy as expected with very detailed builds. Some people never color their builds before the very end (I see you Kubikit), or some like me start coloring from the very start. While you are free to color with your hand, this is where //replace and brushes are the most useful (Look at the first 9th tip for //replace). For brushes, prepare a wand (like a golden shovel) and do //brush sphere [Block ID] [Size], then do /mask [Block ID] with the block ID of the block you wanna replace. When doing this, instead of doing big ugly spheres around, only the block you added on /mask will be affected by the command, which is perfect for coloring the character. I also suggest using 2 very similar blocks for details when coloring something (Example, cyan clay and gray wool), or just one block when you can't find a second block. Makes sure the colorization of your character do not looks too random (which is why you should be careful with //replace)
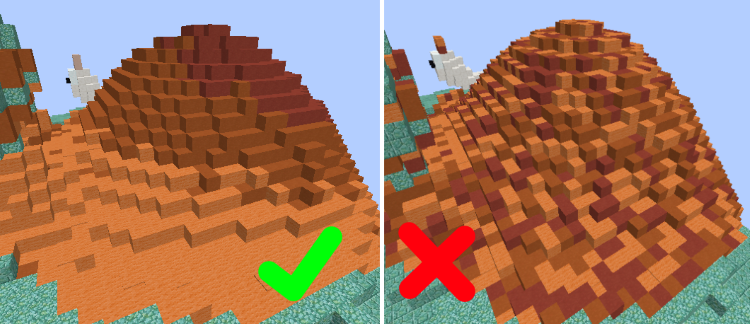
This is something you should not do with //replace when making the color, even with other types of builds (Example with Flow)
Now that you finished making your character, you still need to add the parkour, and there is some things you should do/avoid in my opinion so you don't "ruin" the build.
Firstly, the parkour should stay hidden if possible, if you can build behind or inside the character, that better than in front of. Avoid at all cost adding parkour on the face of the character too, it's kinda ugly in my opinion.
Secondly, like every type of maps, try matching the blocks used for your parkour with the build itself when you can, like avoid using red carpets/glass panes on a blue map. That also mean you should avoid using "cool" blocks like piston heads when they can be replaced with normal blocks, do not add cool blocks for the sake of adding cool blocks, makes sure they looks cool and serve a purpose.
Lastly, please try decorating the jumps, like when you are adding a floating jump, try adding some banners/signs around if it's a full block, or a fence/cobblewall under the block, it's better than just one random block floating. Carpets are also cool, but makes sure you don't make the jump harder or easier with them.
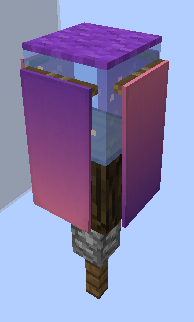
A little example of a decorated floating block from Witch
While making a character is good, sometimes it's better if you add stuff around it, feel free adding a ground and some stuff around, it's also a good way for your parkour to not be clustered on the main build, without making the map messy (Just makes sure the stuff you add around to not hide the main build).
I mostly recommend doing this with small characters, but it's still interesting even for giant builds.
I mostly recommend doing this with small characters, but it's still interesting even for giant builds.
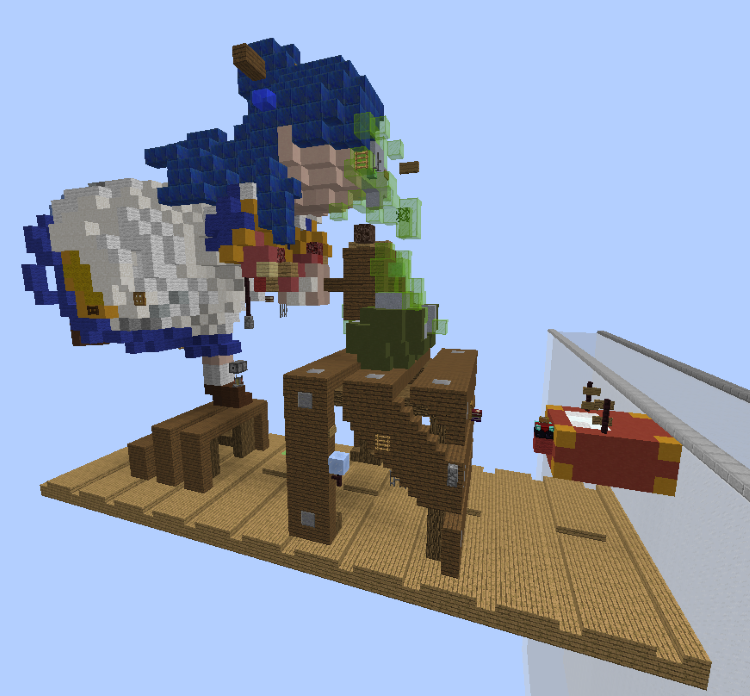
On Bookworm, thanks to all the stuff around, I was able to build a medium with a small build like that without making it too clustered
I may add more tips a next time, but I will stop here, just remember it's not a guide but just some tricks so you can improve making human-like maps.
Hope this thread was useful

